Here’s the Backstory
I was sitting in a greasy spoon outside Greenville the other week, talking with a homeowner who’d just found mold on the back of her living room baseboards. Not a fun discovery.
She said, “We’ve got those little vents in the crawl space, so it should be getting fresh air… right?” Then she paused and added, “But my floors still feel damp. And my power bill is a mess.”
If you live anywhere humid in North Carolina or South Carolina, you’ve probably had a version of that same thought. We’ve got sticky summers, wet springs, hurricane leftovers, and the occasional random week of 80% humidity in October just for fun.
And this is exactly where the benefits of crawl space encapsulation in humid North Carolina start to matter a lot more than most folks realize.
Let’s Clear Something Up
A lot of people still ask, “Is crawl space ventilation still recommended in North Carolina?” Because for years, the idea was simple: put vents in, let the crawl space “breathe,” and that outdoor air would magically dry everything out.
Here’s the twist: in a humid climate, that outside air is usually wetter than the air under your house.
When warm, humid air sneaks into a cool crawl space and hits cooler surfaces (ducts, floor joists, plumbing), the moisture in the air condenses. Kind of like a cold glass of sweet tea on a July afternoon in Charlotte. You don’t dry the glass off by putting it in a more humid room. It just keeps sweating.
So vented crawl spaces in NC and SC often end up:
- Damp or even wet for months at a time
- Growing mold on wood and insulation
- Pulling musty air up into your home
- Making your HVAC work way harder than it needs to
And that’s why more builders, inspectors, and homeowners have shifted toward sealed or encapsulated crawl spaces instead of open, vented ones.
Let’s Make This Simple
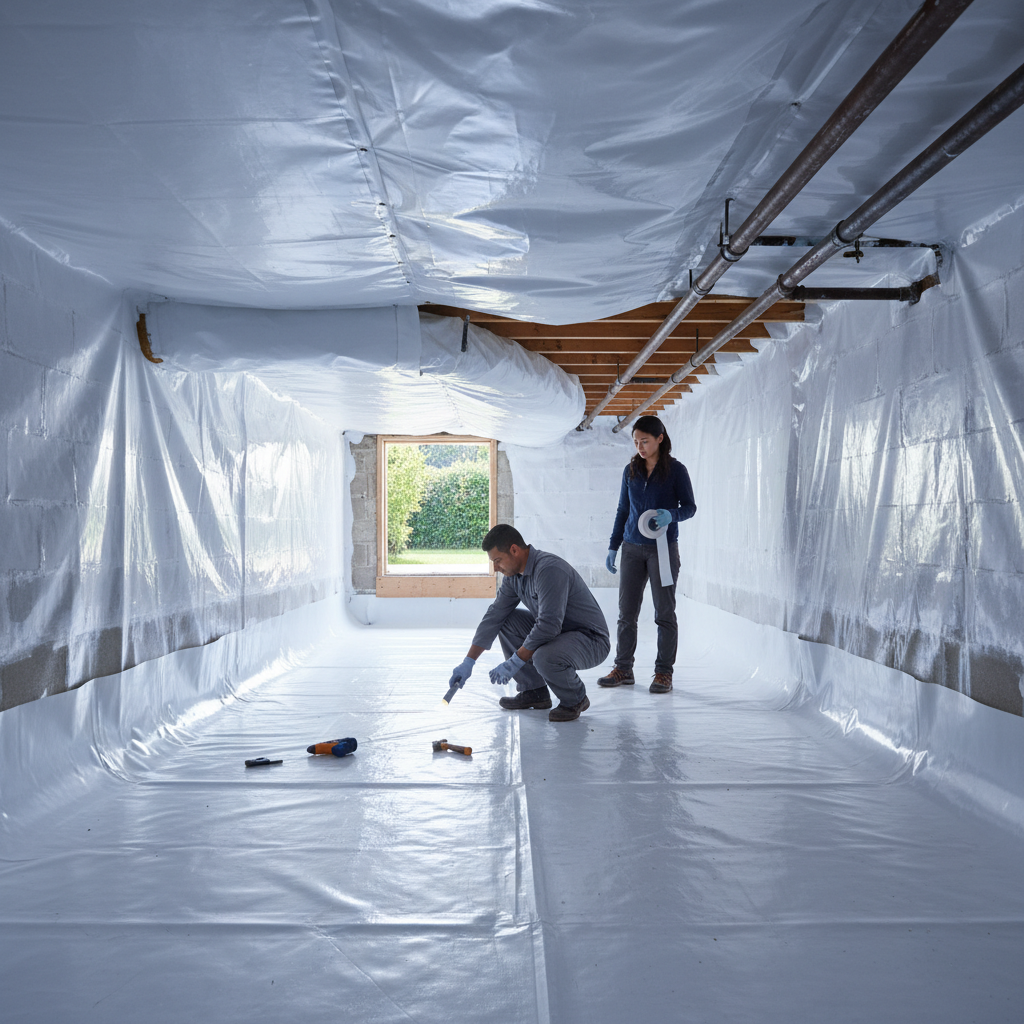
So what is crawl space encapsulation, in plain English?
It’s basically turning your crawl space from “outside-ish” space into “inside-ish” space. Not part of your living room, but treated more like it belongs to the house instead of the yard.
A typical encapsulation usually includes:
- Sealing up foundation vents and gaps
- Installing a heavy plastic or reinforced vapor barrier over the ground and up the walls
- Sealing seams and edges with tape or caulk/adhesive
- Adding a dehumidifier or controlled HVAC supply to keep moisture levels in check
- Sometimes insulating the walls instead of the floor above
That’s the basic idea. But why should you care enough to spend real money on it?
Why This Matters (More Than You Think)
Let’s be real for a second. Nobody wakes up and says, “You know what sounds fun? Investing in my crawl space.”
You care because your crawl space quietly affects your:
- Air quality
- Energy bills
- Comfort (drafts, cold floors, sticky rooms)
- Foundation and wood framing
- Resale value
So let’s walk through the practical benefits of crawl space encapsulation in humid North Carolina, one by one.
Let’s Break This Down
1. Drier Air and Less Mold
Around 40–60% of the air you breathe on the first floor can come from your crawl space. It’s called the stack effect: warm air rises, pulls air from below, and vents out the top of your house.
If that air below your feet is damp, moldy, or musty, guess what’s getting pulled into your living room.
Encapsulation helps:
- Block ground moisture with a thick vapor barrier
- Keep humid outside air from blowing in through vents
- Let a dehumidifier actually control humidity instead of fighting outdoor weather 24/7
That usually means:
- Less mold growth on joists and subfloor
- Lower chance of that “old basement” smell
- Better odds for people with allergies or asthma
2. More Comfortable Floors and Rooms
If you’ve ever walked barefoot on your floor on a January morning in Greensboro and thought, “Why is this so cold?”, your crawl space might be to blame.
Vented, damp crawl spaces:
- Let cold winter air sit right under your floor
- Let insulation sag or fall down when it gets wet
- Make some rooms colder or hotter than others
A sealed, insulated, humidity-controlled crawl space:
- Helps keep your floors closer to room temperature
- Reduces drafts from gaps around floor penetrations
- Helps your home feel less “clammy” in summer
3. Lower Energy Bills (Over Time)
I’m not going to promise you’ll cut your power bill in half. I don’t know everything, and every house is different. But I’ve seen plenty of homeowners in places like Columbia and Asheville report noticeable drops after encapsulation.
Here’s why:
- Your HVAC doesn’t have to fight hot, humid air pouring in from below.
- Conditioned air in ducts isn’t running through a damp, unconditioned space.
- Leaks and gaps are often sealed as part of the project.
When your crawl space is treated as part of the conditioned “envelope” of the home, your system usually runs a bit less and works a bit smarter.
4. Protecting Wood, Insulation, and Ductwork
Constant dampness is bad news for wood. Over time it can lead to:
- Wood rot in joists and beams
- Rust or corrosion on metal supports or duct straps
- Falling, moldy fiberglass insulation
- Condensation and rust on metal ductwork
Encapsulation helps by:
- Keeping humidity in a safer range (usually under 60%)
- Reducing condensation on ductwork and pipes
- Helping wood stay drier and more stable
That doesn’t just protect the crawl space. It protects your whole structure and can extend the life of everything under there.
5. Fewer Pests and Critters
Roaches, spiders, rodents, termites… they love a damp, dark, open crawl space with plenty of entry points.
While encapsulation isn’t a replacement for pest control, it does:
- Seal off a lot of the easy openings
- Make the space less damp and attractive to certain bugs
- Make it easier for pest pros to see what’s going on
And here’s the thing: if a mouse or snake does wander in, a clean white liner makes it much easier to spot droppings, tracks, or damage. Which is way better than digging through wet, fallen insulation and mud.
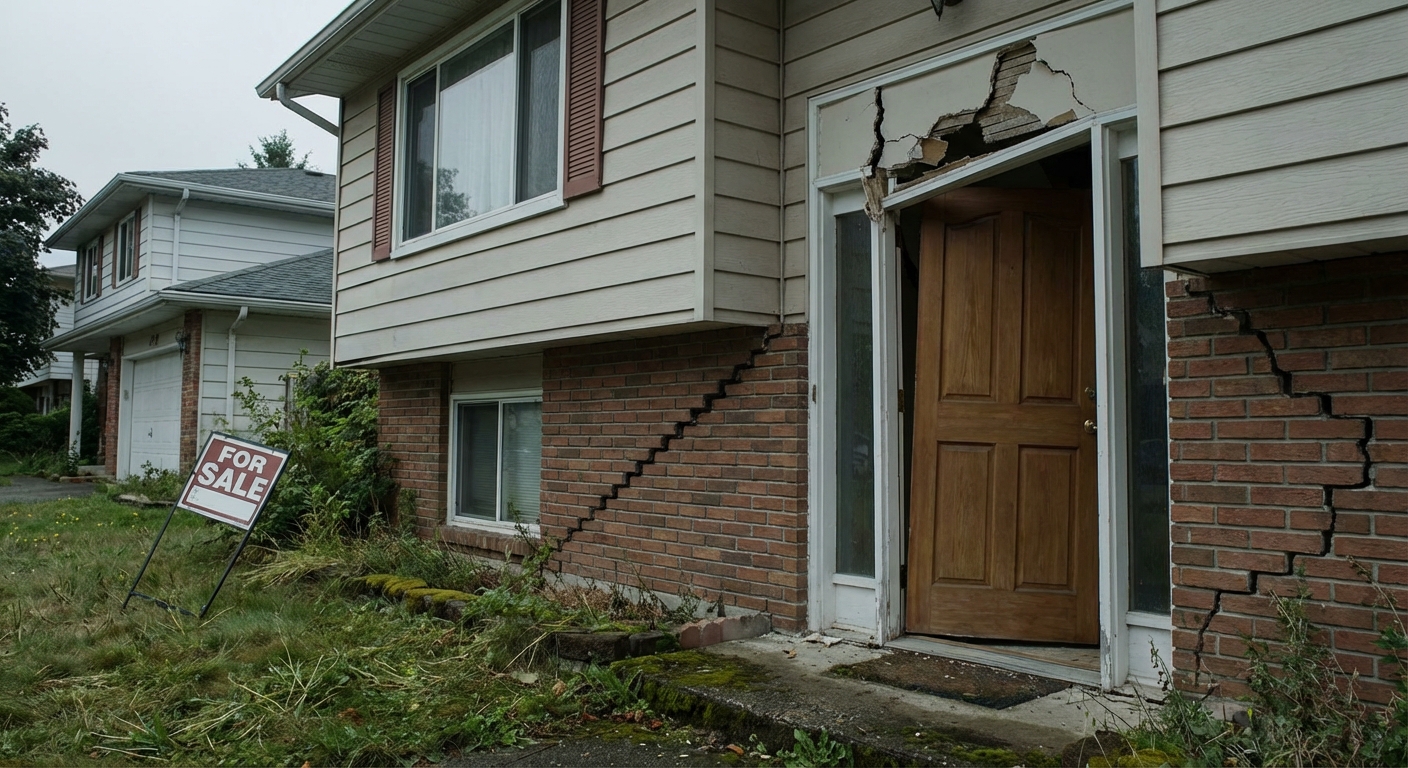
6. Better Resale Story
Picture this: a buyer walks a home in Charlotte. They love the kitchen. The yard’s great. Then the inspector goes into the crawl space and finds:
- Standing water
- Mold on joists
- Insulation hanging down like wet laundry
Suddenly that offer gets smaller… or disappears.
Now picture the same house, but the crawl space is clean, dry, sealed, and has a dehumidifier humming quietly. The buyer might not know all the details, but the inspector will. And that report looks a whole lot better.
The Part No One Talks About
Encapsulation isn’t magic. It’s not a one-size-fits-all sticker you slap on a messy problem.
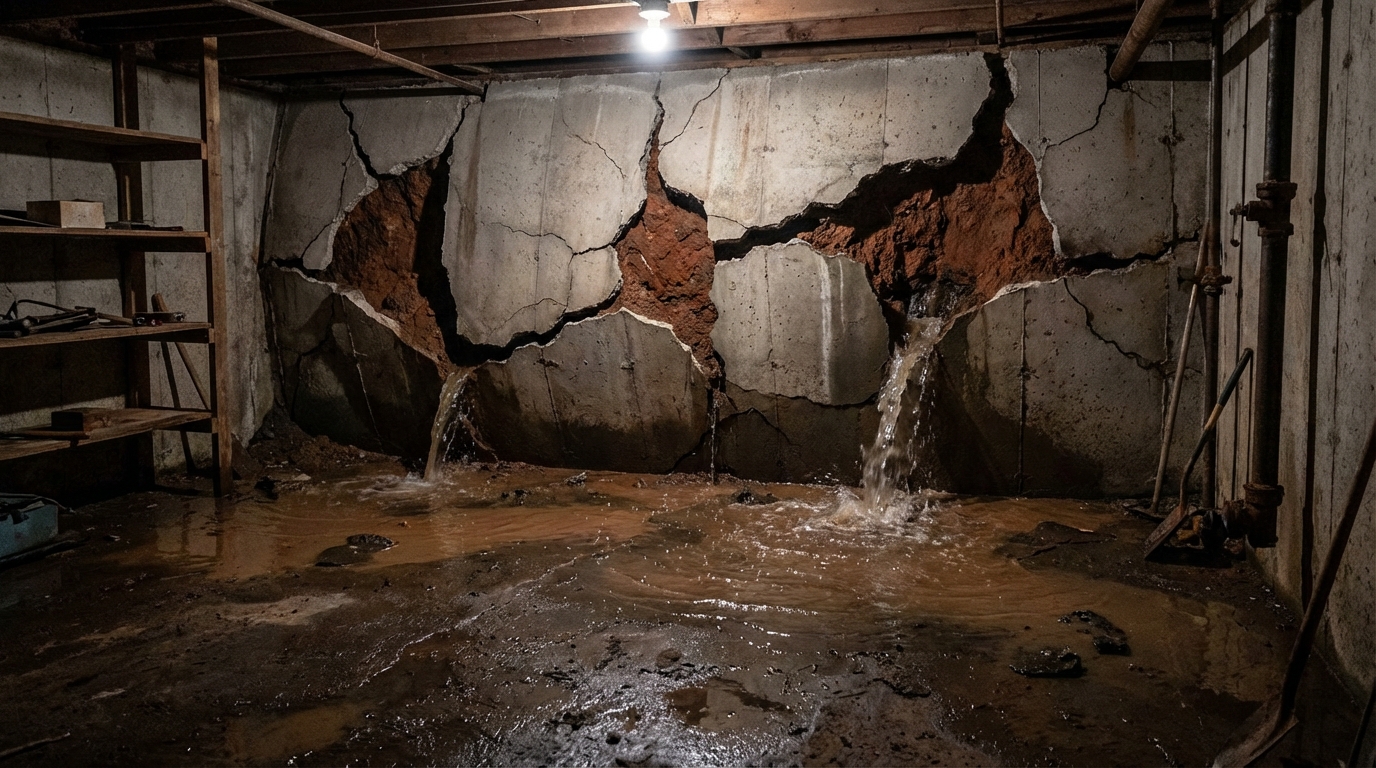
For example, if you’ve got:
- Active standing water from poor grading or broken drains
- Major structural damage to beams or piers
- Sewer or plumbing leaks
Those have to be handled before you think about encapsulating. Otherwise, you’re just trapping problems under a clean, shiny liner.
Also, a dehumidifier in a sealed crawl space needs power, a drain line, and basic maintenance. You can’t just plug it in, forget it exists, and hope for the best.
A Real-Life Moment
Let me share a quick story from a house in Spartanburg.
A couple, Mark and Lisa, had been noticing:
- Soft spots in their hallway floor
- A musty smell in the guest bedroom
- High electric bills (over $350 a month in peak summer)
Their crawl space had:
- Vented block walls
- Thin plastic on part of the ground, ripped and bunched up
- Wet fiberglass insulation hanging down in several spots
- Humidity in the 80–90% range in summer
They ended up:
- Fixing some minor drainage issues outside
- Removing the old damp insulation
- Installing a thick, sealed vapor barrier up the walls
- Closing the vents
- Adding a crawl space dehumidifier with a drain line
A few months later:
- The musty smell inside was basically gone.
- The floors felt more solid and less “bouncy.”
- Their summer power bill dropped by around $40–$60 a month.
Not a miracle, but a real, noticeable improvement. And when they later had the house appraised, the clean, encapsulated crawl space was specifically mentioned as a plus.
A Quick Reality Check
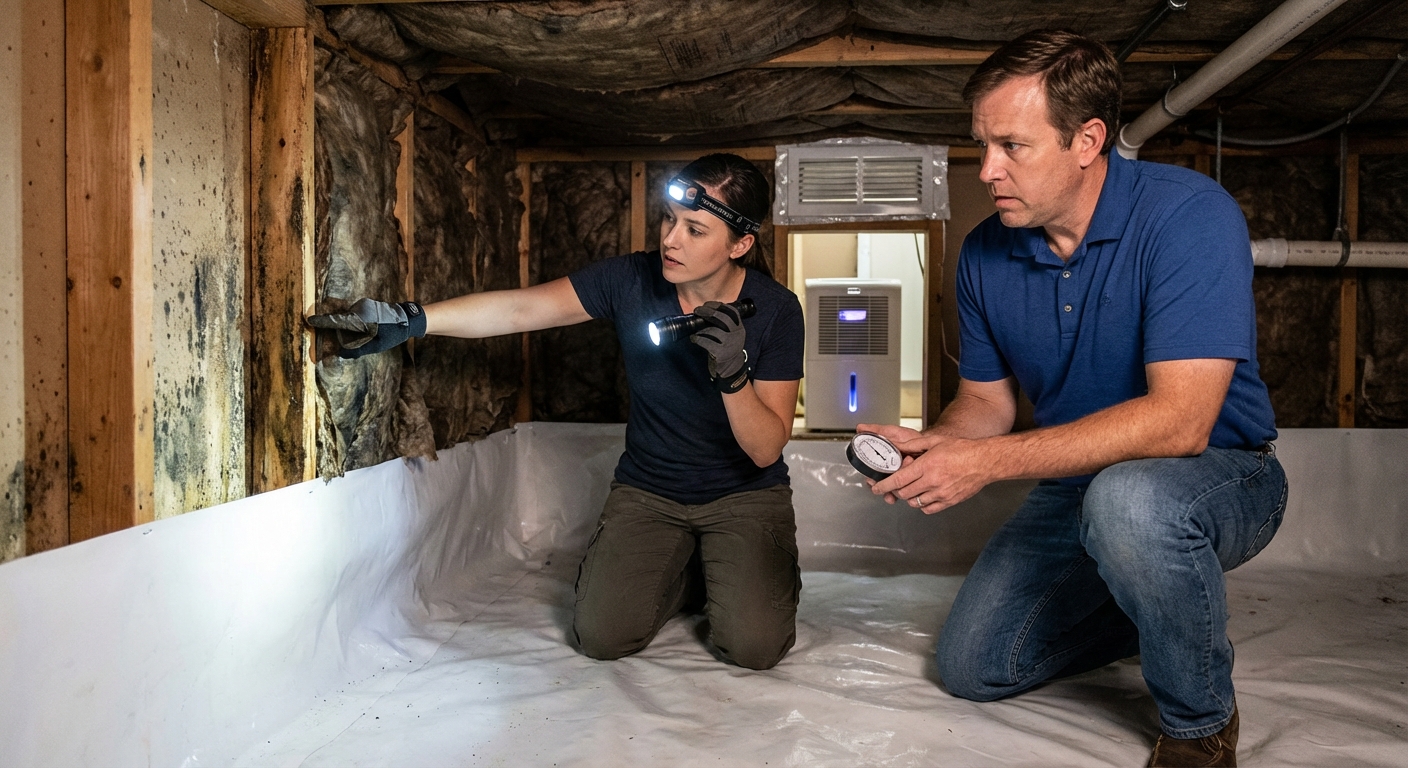
Before you jump in and call someone, it helps to ask a few questions:
- Do you see or smell mold or mildew near your floors or baseboards?
- Are floors cold in winter or “sweaty” in summer?
- Have you noticed high humidity inside (sticky feeling, foggy windows)?
- Does anyone in the house have breathing issues that flare up at home?
- Have you ever actually looked inside your crawl space?
If you’ve never taken a peek, it might be worth a quick look (carefully, with a flashlight, and without touching unknown stuff). What you see there can tell you a lot.
What You Can Do Next
If you’re on the fence, here are a few practical steps:
- Grab a cheap humidity gauge. Put one in your crawl space and one on the first floor. If that crawl space number lives over 70%, that’s a red flag.
- Check for obvious water sources. Gutters dumping next to the foundation, poor grading, disconnected downspouts, or visible standing water under the house need attention first.
- Take pictures. Snap photos of any mold, rot, standing water, or fallen insulation. It helps if you talk with a pro later.
- Get a qualified inspection. A detailed crawl space inspection can tell you if encapsulation makes sense, or if other repairs need to happen first.
- Ask about options. Sometimes you don’t have to do everything at once. You might start with drainage, then encapsulation, then a dehumidifier if needed.
Here’s the Big Takeaway
In a dry climate, venting a crawl space might be fine. But in our sticky, humid part of the world, the benefits of crawl space encapsulation in humid North Carolina add up fast:
- Drier air and less mold risk
- More comfortable floors and rooms
- Potential energy savings
- Protection for your wood, ducts, and insulation
- A better story to tell when you sell
If this all feels like a lot, just start small: look in your crawl space, check the humidity, and write down what you see. From there, you can decide if sealing things up is a “someday” project or a “yeah, maybe we should do this soon” kind of job.
And if you’re not sure what you’re looking at, that’s okay. Reach out for a local inspection, ask plenty of questions, and take your time. It’s your house. You deserve to understand what’s going on underneath it.